Blog

5 Things I WIsh I Knew My First Year Teaching Art
Starting your first year teaching art can feel exciting, overwhelming, and a little intimidating. In this blog, I share 6 lessons I wish I knew back in 2008—from building relationships before diving into content, to mastering classroom management, using positive reinforcement, and meeting students where they are. You’ll also learn why it’s okay to take things slow, start simple with supplies, and stop comparing your classroom to Pinterest-perfect setups. Whether you’re a brand new art teacher or just looking for a reset, these tips will help you create a warm, supportive art room where students feel valued and inspired. Keywords: first year art teacher tips, art classroom management, positive reinforcement in the art room, new art teacher advice, elementary art teaching strategies
Learn more
Simple, Low-Cost Classroom Management Ideas That Actually Work (and Your Students Will Love!)
Looking for easy and effective classroom management strategies for your art room? In this post, I’m sharing two of my favorite positive reinforcement techniques that are simple, low-cost, and actually work—especially in elementary art classrooms. From choosing a daily “Art Star” to rewarding students with face painting days, these classroom management ideas help build a positive classroom culture without breaking the bank. Perfect for new and veteran art teachers alike!
Learn more
How to Make a Textured 3D Tree for Your Classroom or Art Show
Creating a large, textured tree is a beautiful, dynamic project that can be used year after year to create an immersive experience for an art show or your classroom. Whether you're celebrating the seasons, creating a backdrop for an art exhibit, or just looking to add some creative flair to your space, this DIY tree project is a perfect fit. Here’s how to make it step-by-step. Materials Needed: Painter's tape Brown kraft paper Foil (for texture) Hot glue gun Brown paper towels (for paper mache) Paper mache paste (homemade or Elmer's glue paste) Cheap green plastic tablecloths Paper clips or binder clips Pool noodles (optional for branches) Streamers or twisted green bulletin board paper (for vines) Paint and brushes (for embellishments) Step 1: Set the Base Start by finding a column or bump-out wall space to use as the tree's base. Secure brown kraft paper onto the wall with painter's tape to form the trunk of the tree. This will provide a sturdy foundation for the rest of your project. Step 2: Add Texture with Foil Crinkle some strips of foil and hot glue them onto the kraft paper base. This adds texture and gives the tree a more sculptural, realistic look. Foil is lightweight but can still give the appearance of rough bark or tree texture. Step 3: Paper Mache the Trunk Next, use strips of inexpensive brown paper towels (perfect for this project and commonly found in schools!) to create a paper mache layer over the foil. Dip the strips into paper mache paste (you can either make it yourself or use Elmer's glue paste) and apply them over the crumpled foil. This layer adds both texture and strength to the trunk. Step 4: Create the Tree's Leaves For the leaves, use green plastic tablecloths from the dollar store. These are cheap, easy to work with, and have a nice flowing texture. Attach the tablecloths to the ceiling using paper clips or binder clips, letting them hang down to form the main body of the tree’s leaves. Step 5: Make Vines to Hang from the Tree Create some fun vines by twisting green bulletin board paper, streamers, or strips of tablecloths. Drape them around the tree to give it an extra layer of whimsy and realism. You can even have your students help create these in bulk for efficiency! Step 6: Add Branches with Pool Noodles If you'd like to add branches to your tree, pool noodles work wonderfully. Cut them to the desired length, then wrap them in crumpled kraft paper and secure them using hot glue or more paper mache. This makes for flexible, lightweight branches that can be arranged however you like. Step 7: Embellish the Tree Trunk Once the basic structure is in place, it’s time for some finishing touches! Use a dry brush technique with different shades of brown paint to add texture to the trunk. You could also paint in a critter in a hole in the tree, or get creative with other ideas to personalize the look. Step 8: Bonus – Reuse Your Tree for Different Celebrations One of the best parts about this project is that it’s versatile! You can reuse the tree year after year for different themes or school events. For example, I used this tree as part of a Mister Rogers-themed art show. The possibilities are endless when you think about how to incorporate the tree into different celebrations or art show themes! This DIY tree is a fun way to add a creative element to your space, and the best part is it can be used for multiple purposes throughout the year. From art shows to classroom decor, it’s sure to be a hit! Happy crafting!
Learn more
Face Painting Tips for Beginners
Face painting can be a fun and rewarding skill to pick up, whether for classroom rewards, birthday parties, or community events. These five beginner-friendly tips will help you get started with confidence, from choosing simple designs to managing eager kids in line!
Learn more
10 Reasons Why You Should Share Your Personal Art with Your Students as an Art Teacher
As an art teacher, one of the most impactful things you can do is share your personal artwork with your students. This not only inspires them but also demonstrates your credibility and passion for art. By showcasing your unique creations, you provide real-life examples of artistic techniques and growth. Your students will see firsthand the dedication and skill involved in creating art, which can motivate them to invest more deeply in their own artistic journeys. Learn how sharing your personal art can transform your teaching approach and inspire your students to reach new heights in their creativity.
Learn more
5 Unexpected Pieces of Advice for New Art Teachers: Lessons from a Veteran Art Teacher
Discover five essential pieces of advice for new art teachers from my 15 years of experience teaching elementary art. Learn how to slow down, set boundaries, and collaborate with colleagues to create a supportive and inspiring art education environment. Embrace these tips to enhance your teaching journey and let your creativity shine.
Learn more
How to Respectfully say No to Excessive Requests as an Art Teacher
Art teachers often face numerous miscellaneous requests that can overwhelm their schedules. Learn effective and respectful ways to say no, maintain boundaries, and focus on your primary teaching responsibilities with our guide on how art teachers can manage extra requests in schools.
Learn more
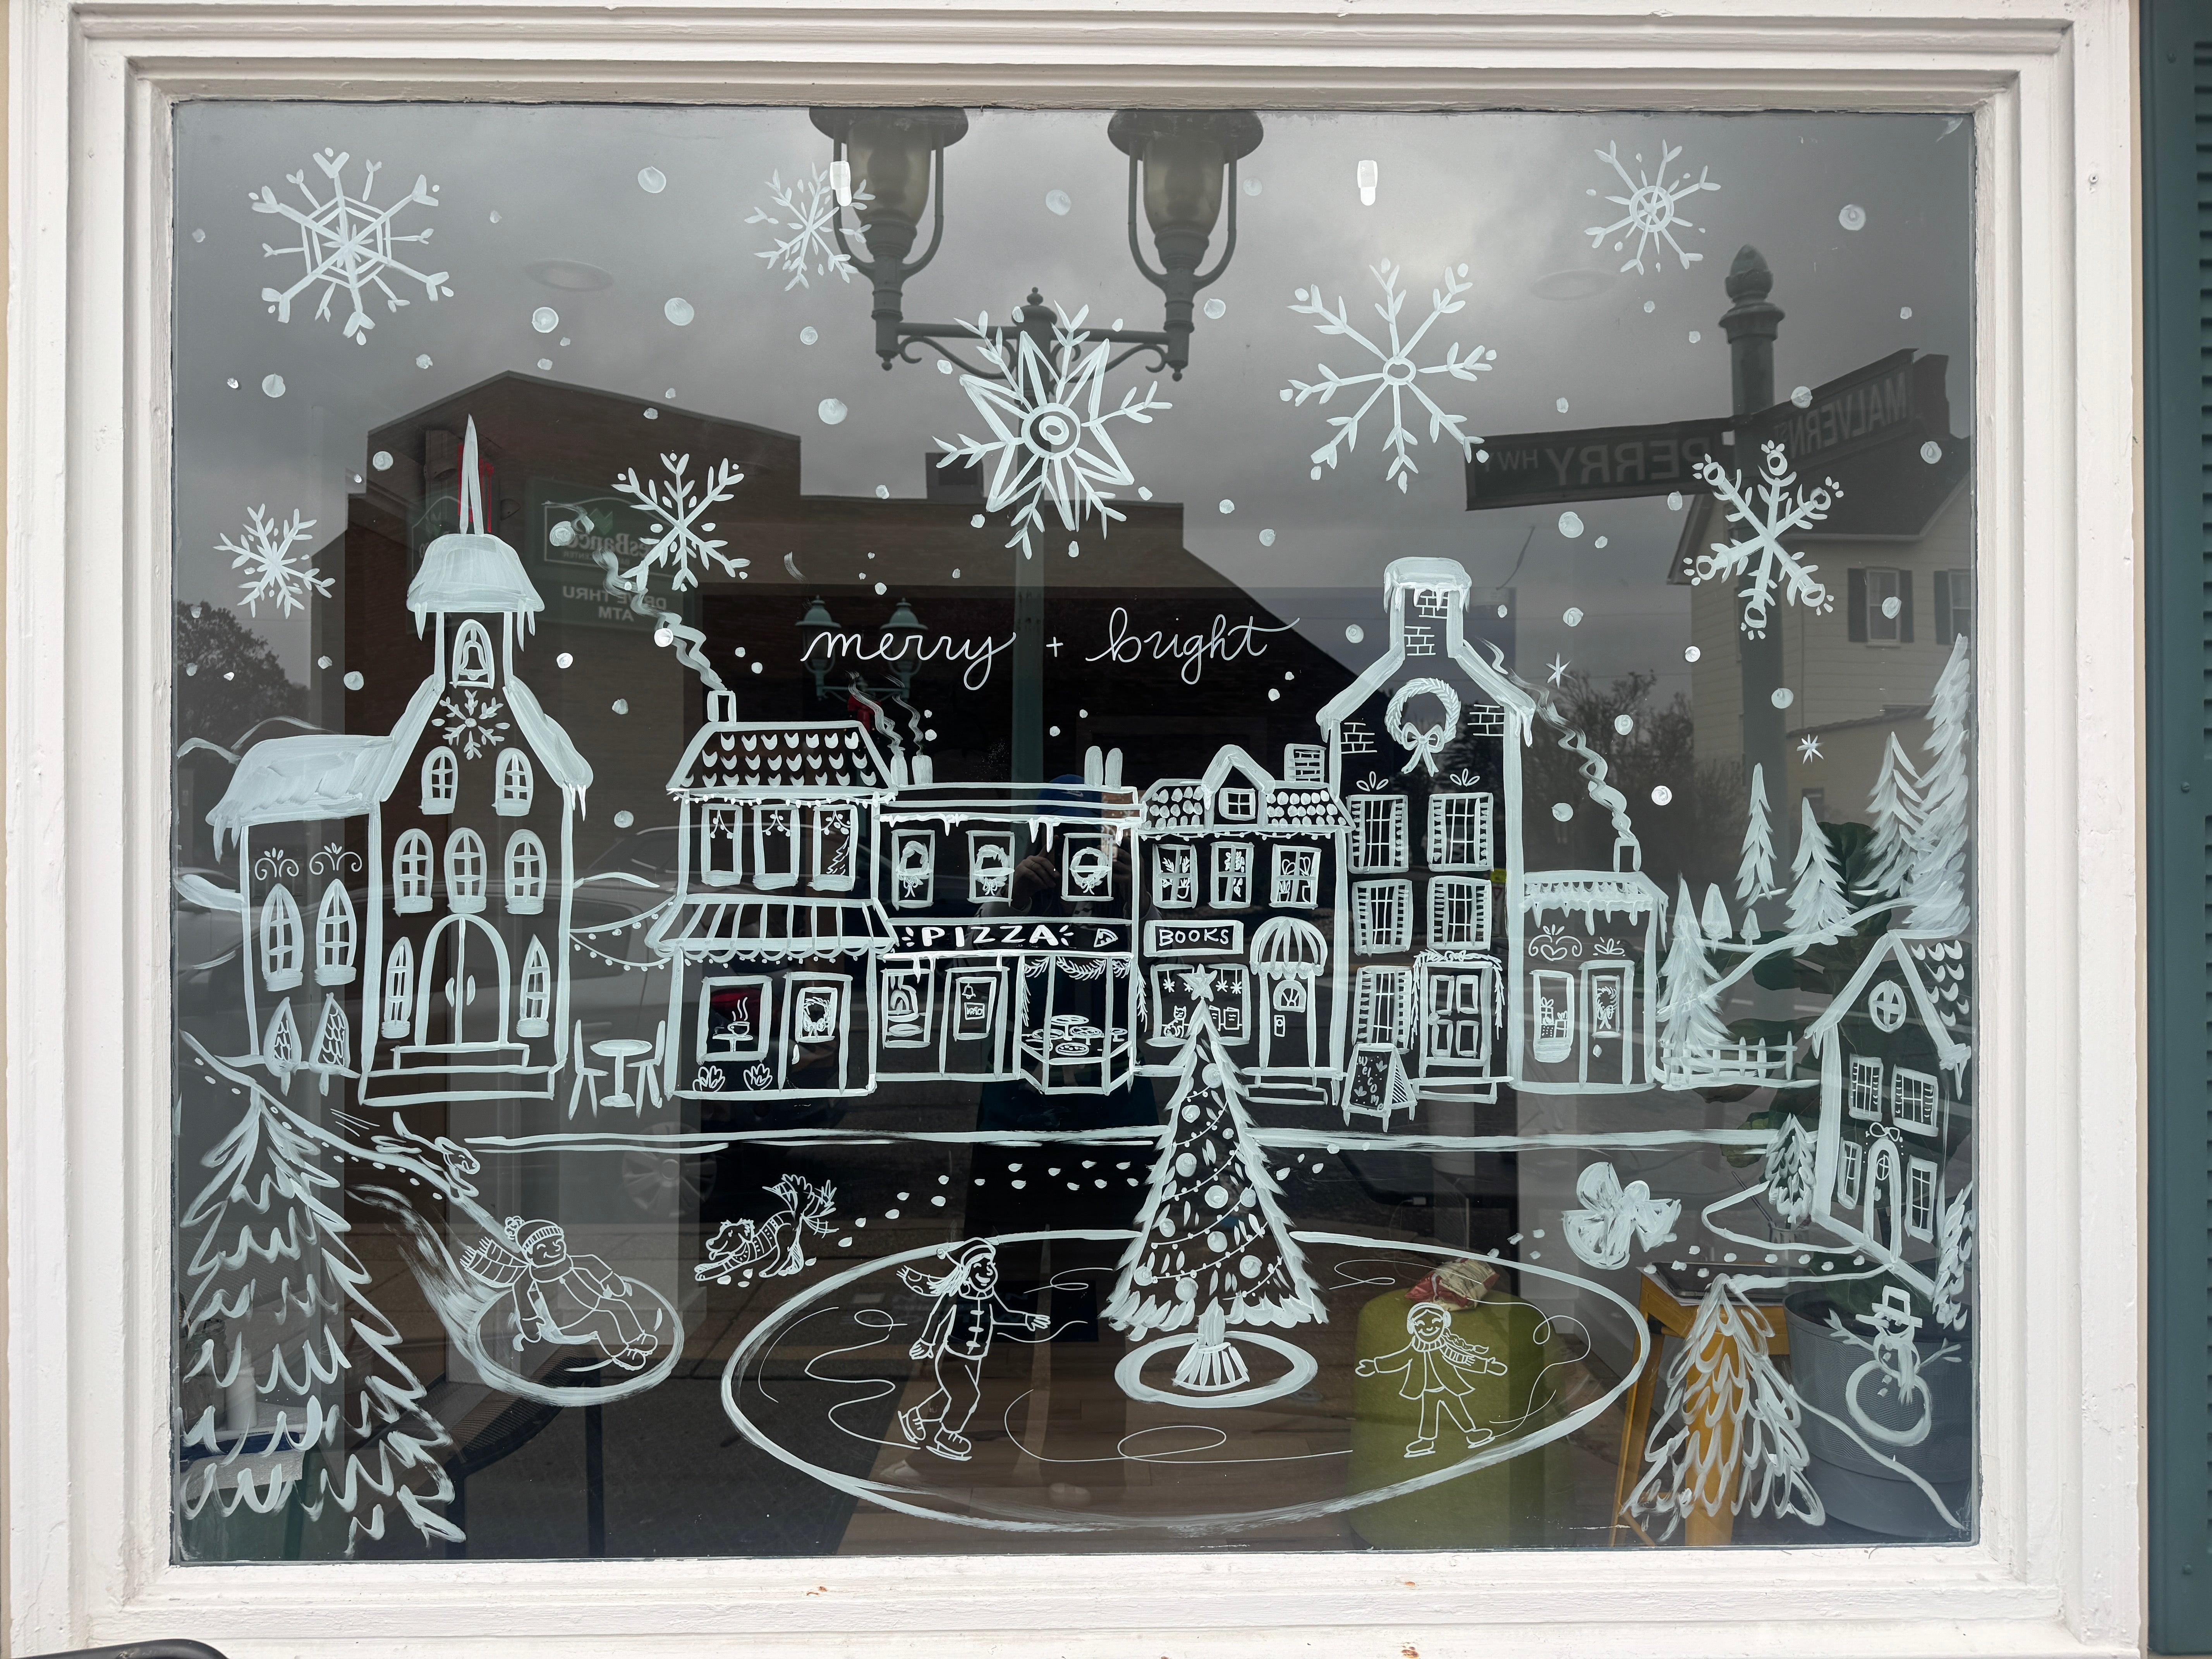
Window Painting 101: How to Paint Festive Windows at School or Home
One of my favorite ways to spread holiday cheer throughout my school community has been to paint the windows. Painting the windows in your classroom, front office, library, wherever is such an amazing way to make a BIG impact with just a little time and paint. This is also a fun way to involve your students in a community based art project (if the imagery is simple enough!) Today I want to share all I know about window painting, share my process, as well as answer some of the questions I have received over the years when it comes to painting windows. So let's go! How to Paint Windows for the Holidays: In this blog, we'll guide you through the creative process of painting your windows, adding a personalized touch to your surroundings that captures the magic of the holidays. Gather Your Supplies: Before diving into your holiday masterpiece, gather the necessary supplies. You can honestly use many different times of paint/ markers to decorate the windows. I prefer to use tempera paint as it just washed right off! I love Crayola Premier paint. However, you can also use water based acrylic paint, paint pens, or chalk markers! Choose a color palette that perhaps compliments the surrounding area/ decor, or you can keep is classic and simple and just use all white! Sketch/ Gather Inspiration For Your Design: Start by sketching your design on paper to visualize how it will look on your windows. It would be just something real quick to help you with layout, and then you can reference other imagery while you work. You could consider more classic holiday imagery like snowflakes, ornaments, or festive landscape. You could also choose to paint some of the iconic holiday characters around this time of year- I have loved painting My favorite imagery has been painting a winter village. It's festive yet not specifically Christmas. I recently painted the windows at my local library and opted to paint a woodland creatures winter scene, as they had expressed they would like the leave the windows up throughout the winter, not just December. Here is a step by step tutorial for painting your own winter burrow scene from a recent blog post. You can find a link to my drawing guide for winter village drawing guide here, as well as my woodland creatures guide here. Prepare the Windows: If your windows are notably dirty, it would probably be a good idea to clean them before painting! You also might want to lay down a drop cloth, or just a poster board along the window ledge to catch any paint drips. Get Painting: With your design in mind and your windows prepped, it's time to bring your vision to life. If you want to begin with the end in mind- and would like to use a scraper to take the window paint off, you can add a pump or two of dishsoap to the paint for easy clean up! Now, just keep in mind, the more soap you add, the thinner/ more diluted your tempera paint will be. If you would like paint that is more opaque, then just use the tempera paint as it is. Gather a mixture of brushes to vary line thickness. I like having a few brushes of each size/ shape. I mostly end up using flat brushes to paint windows. I use large + medium flat brushes for painting in larger areas, and medium + smaller round brushes for smaller details. Once you get painting you will discover what brushes work best for you! * A few other things to note about the painting process: * If you are planning on making your windows visible from both sides of the window, you need to consider your process. If you use only one color (like the white for the winter village) you will be fine! Everything will be drawn in a monoline and perfect from all sides of the window. However, if you are painting a character or scene with more colors and wish to have a black outline, you will need to start with the black outline of your scene first. Typically when we paint, we block in shapes first and then add the black details on top so they are visible- but if you would like your windows to be viewed on both sides, you will need to: 1. Paint the black outline first. 2. Paint in the colors of the shapes as if you are working on a coloring book page. Meaning- do not paint over the black outlines, as this will move/ smudge the black paint and mix it into your colors. Only paint in the negative spaces in and around the black outline.Then, once evetything is painted in, you can add a bit more black on top to clean up/ darken your black outlines. Just be sure to wait for the paint to dry so it doesn't move/ you don't pick the paint back up. If you are going to blend colors, you will need to blend as you paint, and while the paint is wet! Once you let tempera paint dry on the window, if you try to paint over it, it will be darker, look splotchy and not look as clean as if it were all painted in one layer. Try to avoid layering as much as possible on windows, unless you are using acrylic paint and don't plan on making your windows viewable from both sides. Here is an artist, Lindsey Morales who paints windows for the season on business's windows. She uses interior acrylic house paint and paints a base layer of white first and then builds up her painting like she would on a canvas or mural- but note: her paintings aren't viewable from the inside of the building, as all you would see is the white base layer. 5. Share the Joy: Your painted windows are sure to bring smiles to those passing by. Share the joy with your community by taking photos and sharing them through your newsletter or social media. You can consider organizing a window-painting event with your students to make it a shared experience. There is no better feeling than knowing you are spreading joy for other's to enjoy- what a special feeling you can share with your students. 6. Clean-Up and Removal: When the holiday season comes to an end, remove the window paint using a damp cloth or window cleaner. Washable window paint is designed to come off easily, leaving your windows clean and ready for the next creative endeavor. If you used soap in your tempera paint you can use a large paint scraper to scrape the paint off the windows. You can also use a paint scraper to take to acrylic paint off, you just have to spray the paint with water first to loosen the paint. Here is the window scraper I recommend! Painting your windows for the holidays is a wonderful way to express your creativity, spread festive cheer, and bring a touch of magic to your surroundings. Whether you're creating a winter wonderland or a scene straight from your imagination, let your holiday spirit shine through your painted windows to spread joy and love to others! Happy Creating!
Learn more
Unlocking the Power of Arts Integration: Fueling Creativity and Learning
Discover how arts integration transforms education, enriching the academic experience and boosting creativity. Explore the myriad benefits of infusing art into traditional subjects, from enhancing academic performance to fostering emotional intelligence. Unleash the potential of your students as they paint a brighter, more colorful path to knowledge through art-inspired learning.
Learn more
Diverse Famous Artist Posters for the Art Room
If you're looking for a way to add color, creativity and rich art history into your art room, then I have the perfect visuals for you. Meet the Famous Artists Poster series, perfect to bring art history to life for art students of all ages. Your art room is about to become a living canvas as we showcase the work of some of the most celebrated artists in history, spanning various eras and genres. From the timeless beauty of Leonardo Da Vinci's Renaissance masterpieces to the bold, contemporary expressions of Jean-Michel Basquiat, we've curated a selection that's as diverse as it is inspiring.
Learn more
How to Make DIY Sketchbooks in the Elementary Art Room
Learn how to make easy DIY sketchbooks for elementary students using budget-friendly materials! Perfect for art teachers, parents, and homeschoolers, this guide offers simple binding techniques to create personalized sketchbooks that inspire creativity in the classroom or at home.
Learn more
10 Effective Ways to Foster Genuine Connections with Your Art Students At the Start of The Year
Discover 10 practical strategies to establish authentic connections with your art students at the start of the school year. From showing genuine interest in their interests and hobbies to creating and fostering a supportive environment, this blog offers valuable insights for art educators seeking a way to further connect with their students.
Learn more


