


How to Paint Windows for the Holidays:
In this blog, we'll guide you through the creative process of painting your windows, adding a personalized touch to your surroundings that captures the magic of the holidays.
-
Gather Your Supplies: Before diving into your holiday masterpiece, gather the necessary supplies. You can honestly use many different times of paint/ markers to decorate the windows. I prefer to use tempera paint as it just washed right off! I love Crayola Premier paint. However, you can also use water based acrylic paint, paint pens, or chalk markers! Choose a color palette that perhaps compliments the surrounding area/ decor, or you can keep is classic and simple and just use all white!

-
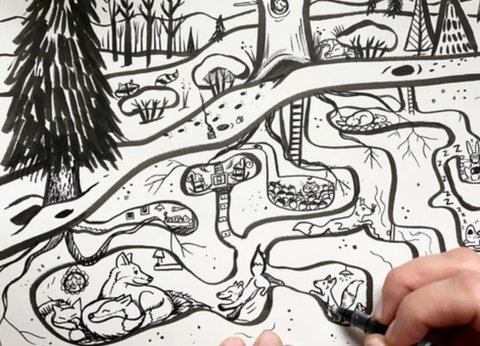
Sketch/ Gather Inspiration For Your Design: Start by sketching your design on paper to visualize how it will look on your windows. It would be just something real quick to help you with layout, and then you can reference other imagery while you work. You could consider more classic holiday imagery like snowflakes, ornaments, or festive landscape. You could also choose to paint some of the iconic holiday characters around this time of year- I have loved painting My favorite imagery has been painting a winter village. It's festive yet not specifically Christmas. I recently painted the windows at my local library and opted to paint a woodland creatures winter scene, as they had expressed they would like the leave the windows up throughout the winter, not just December. Here is a step by step tutorial for painting your own winter burrow scene from a recent blog post. You can find a link to my drawing guide for winter village drawing guide here, as well as my woodland creatures guide here.

-
Prepare the Windows: If your windows are notably dirty, it would probably be a good idea to clean them before painting! You also might want to lay down a drop cloth, or just a poster board along the window ledge to catch any paint drips.

-
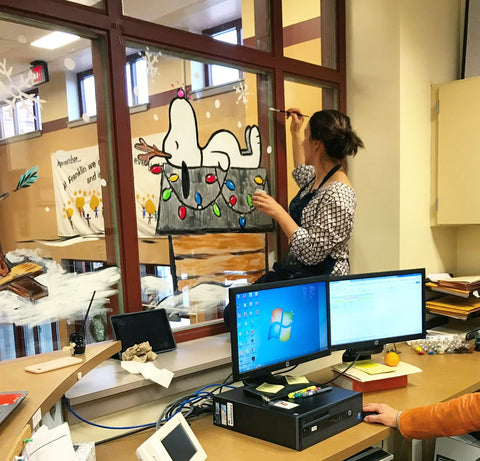
Get Painting: With your design in mind and your windows prepped, it's time to bring your vision to life. If you want to begin with the end in mind- and would like to use a scraper to take the window paint off, you can add a pump or two of dishsoap to the paint for easy clean up! Now, just keep in mind, the more soap you add, the thinner/ more diluted your tempera paint will be. If you would like paint that is more opaque, then just use the tempera paint as it is. Gather a mixture of brushes to vary line thickness. I like having a few brushes of each size/ shape. I mostly end up using flat brushes to paint windows. I use large + medium flat brushes for painting in larger areas, and medium + smaller round brushes for smaller details. Once you get painting you will discover what brushes work best for you!
- If you are planning on making your windows visible from both sides of the window, you need to consider your process. If you use only one color (like the white for the winter village) you will be fine! Everything will be drawn in a monoline and perfect from all sides of the window.
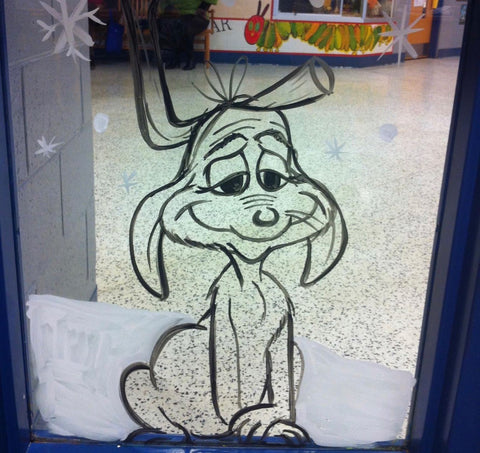
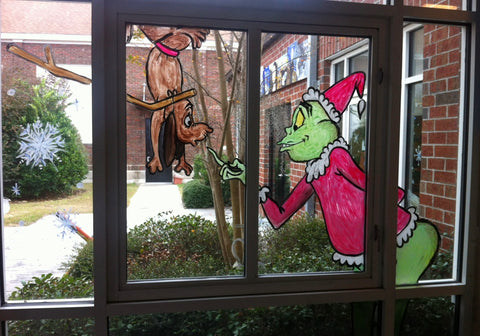
- However, if you are painting a character or scene with more colors and wish to have a black outline, you will need to start with the black outline of your scene first. Typically when we paint, we block in shapes first and then add the black details on top so they are visible- but if you would like your windows to be viewed on both sides, you will need to: 1. Paint the black outline first. 2. Paint in the colors of the shapes as if you are working on a coloring book page. Meaning- do not paint over the black outlines, as this will move/ smudge the black paint and mix it into your colors. Only paint in the negative spaces in and around the black outline.Then, once evetything is painted in, you can add a bit more black on top to clean up/ darken your black outlines. Just be sure to wait for the paint to dry so it doesn't move/ you don't pick the paint back up.
- If you are going to blend colors, you will need to blend as you paint, and while the paint is wet! Once you let tempera paint dry on the window, if you try to paint over it, it will be darker, look splotchy and not look as clean as if it were all painted in one layer. Try to avoid layering as much as possible on windows, unless you are using acrylic paint and don't plan on making your windows viewable from both sides. Here is an artist, Lindsey Morales who paints windows for the season on business's windows. She uses interior acrylic house paint and paints a base layer of white first and then builds up her painting like she would on a canvas or mural- but note: her paintings aren't viewable from the inside of the building, as all you would see is the white base layer.

5. Share the Joy: Your painted windows are sure to bring smiles to those passing by. Share the joy with your community by taking photos and sharing them through your newsletter or social media. You can consider organizing a window-painting event with your students to make it a shared experience. There is no better feeling than knowing you are spreading joy for other's to enjoy- what a special feeling you can share with your students.

6. Clean-Up and Removal: When the holiday season comes to an end, remove the window paint using a damp cloth or window cleaner. Washable window paint is designed to come off easily, leaving your windows clean and ready for the next creative endeavor. If you used soap in your tempera paint you can use a large paint scraper to scrape the paint off the windows. You can also use a paint scraper to take to acrylic paint off, you just have to spray the paint with water first to loosen the paint. Here is the window scraper I recommend!

Painting your windows for the holidays is a wonderful way to express your creativity, spread festive cheer, and bring a touch of magic to your surroundings. Whether you're creating a winter wonderland or a scene straight from your imagination, let your holiday spirit shine through your painted windows to spread joy and love to others! Happy Creating!


11 comments
You are amazing. I only planned on doing a little research and now I think I’m gonna go and paint the windows at my house.
Thanks for this article! It was a quick read and told me exactly what I needed to know, plus some great extra information!
How to clean it up
Christy,
Do not use tempera outside! Rain and snow will make it run. Use white latex as a base and either latex and/or acrylic for the rest.
Christy,
Do not use tempera outside! Rain and snow will make it run. Use white latex as a base and either latex and/or acrylic for the rest.