
Looking for the best way to hang student art for your school wide art show? Well, look no further people. This method comes from the many " Art Teacher Greats" (aka my former coworkers and their predecessors- shout out to Lee Knapp!) who have set THE standard for art show extravagance. Say goodbye to tape donuts because this will change your art show game. Are ya ready? Let's go!
POSTER STRIPS & BINDER CLIPS
Ok first, I am going to apologize for these sub par photos of the steps of this process. They are actually screenshots taken from a reel that I have sharing the whole process on my Instagram. If you're interested, you can see the video here. But the photo quality really isn't important, it's in the steps!
Step 1: Cut Poster Board or Railroad Board in to Strips.

The width of these strips was around 7" or so, but you can experiment with what width works best for you. The length is just the length of the poster board. Now, depending on how long you would like the art to hang, you can staple two or three of these strips together that will reach from the ceiling to the floor. Or, you could use shorter strips to hang over door frames and smaller hard to reach places. The width and length of these are not as important as the material and method. Make sure you are using poster board or railroad board- the paper must be sturdy! I opted to use black for most of my strips so that I could mat the artwork in coordinating colors. But the colors are totally up to you!
Step 2: Fold the Top Towards You

The reason for this is that you will be sliding these poster strips into the little medal grid that is on *most* school ceilings.
Step 3: Staple Artwork to Strips
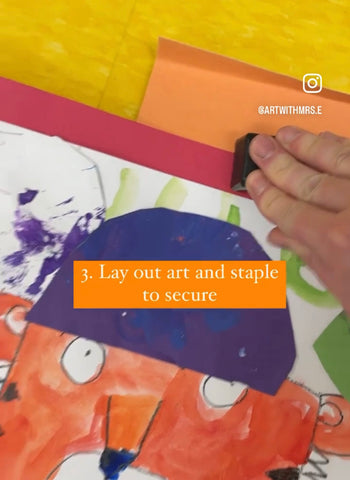
Depending on the size of the artwork, you may want to do two staples at the top and one at the bottom, or just one on top and one on the bottom is fine. You want to AVOID only putting on staple at the top because the artwork can swing, and also depending on how heavy the piece is, it may be too heavy and rip through and fall to the floor. Staple as many pieces of art to your strips as you feel make sense. Just make sure your gap between pieces is consistent!
Step 4: Bust out the Binder Clips!

Repeat after me... "The ONLY way to hang art from the ceiling is with binder clips!" Seriously- I have done LOTS of trial and error over the years and binder clips are a one stop shop that saves so many steps and time! I use the small/ medium sizes!
Step 5: Clip the Strips!

Using a binder clip, clip the poster strip to the metal on the ceiling closest to the wall.

Step 6: Rinse & Repeat!

Repeat these steps as many times as you need to hang the art! One thing you want to consider is how the art will be placed on the strips near each other. So I recommend laying out the strips and art all out on the floor, arrange them how you would like (make sure two pieces are bumping into one another- I recommend staggering them) and then staple the art and hang.


You can also use this method when hanging banners as well- another method I have used and loved over the years! The only downside with banners is making sure you do not ruin the art when taking them off the banners! What I like about this poster strips method is that these strips can be SAVED AND USED AGAIN next year!!! Banners usually have to be ripped to get the art off and are hard to salvage for multiple years (and feel a bit wasteful). But whatever method you decide to go with- Best of luck!! You've got this!
Happy creating!
Kaitlyn


6 comments
Thank you for sharing! I noticed the striking black and white portraits! Would you mind sharing the inspiration/process for this project?