
One of my favorite times of the year to create art with my adapted art class is in December and January. I feel like there as so many possibilities for magical art making and a chance to connect with kids about what they are already thinking about 24/7- the holidays!
Here is a list of my top 5 favorite art projects that I have created with my adapted art students over the years.
1. CARDBOARD GINGER BREAD HOUSES

If I've said it once, I'll say it 100 times- never, I repeat NEVER throw away any oversized cardboard in your art room! One of my favorite pieces of cardboard to use with my adapted kids is the cardboard that large poster board of railroad board comes in. It's one of my favorites to transform into houses with the kids!
 .
. 
Using white paint or white paint sticks (we use Kwik Stix) start off your students by drawing a few shapes to indicate a house, like a door, a few windows and maybe a roof. After that, allow them to use their white material to go crazy drawing or painting the "frosting" lines and details on their gingerbread house. You can then bust out all kinds of fun materials to glue or stick on for the "candy" like pom poms, foam pieces, ribbon, doilies, glitter and more.

2. WINTER SENSORY BOTTLES/ SNOW GLOBES

Such a fun one! If you haven't made sensory bottles yet with your adapted art class, you can find my full tutorial here. But the fun thing about this one is you can even add a photo of your student inside the sensory bottle and make it look like a snow globe! One of the first things we did for this project was go outside on a little "nature walk" and pick up anything on the ground we could find that reminded us of winter. Maybe it was pine needles, pine cones or acorns. Then we went inside and added them to our sensory bottle. Filled our bottle with water, glue and glitter- hot glued the lid and there ya go! You could also try a waterless snow globe ornament! You can find a full tutorial here.
 .
.  .
. 
3. COLLABORATIVE WINTER VILLAGE BANNER

My students always loved coming into my class and seeing a huge banner drawn out ready for them to paint or color in! This collaborative banner idea is pretty popular in the art education community and even more so, drawing it out in a bingo dauber (thanks to Cassie Stephens for this hack!)
All you need is my winter village drawing guide, a roll of paper (I have used either down kraft paper or white paper but any color would work!) and a bingo dauber with black india ink or black paint to draw the village in. Lay your roll of paper out and begin drawing a larger than life winter village! Obviously this would need to be prepped ahead of your students arrival, but it's super relaxing to draw (if that's any incentive). Once students arrive, allow them to either use washable paint (add white to the paint if you are painting on colored paper) or use Kwik Stix to color the banner in. Once completely filled in, you can make some large pine trees to pair with your banner and display the banner in the hallway, office or classroom!


4. SHAVING CREAM PRINT PINE TREES
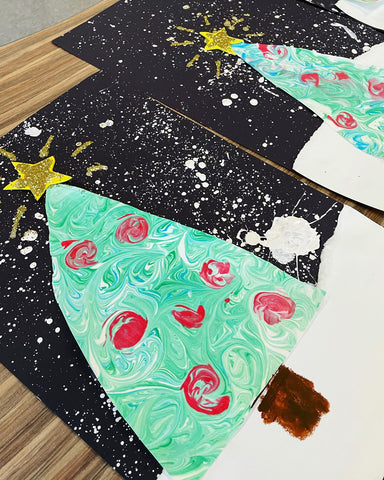
I saw this project from the super talented Natalie Waggenspack's blog Elementary Art Fun (post linked here!) and new my adapted students would LOVE it. Natalie does such a great job laying out all the steps in her blog so definitely click through for her process, but here are a few photos of my students hard at work!
5. MUFFIN TIN ORNAMENT PRINTS

This is a project I came up with during the dreaded 2020-2021 teaching year when we were in a stretch of being fully remote. I remember recording it all for my adapted students and then my son seeing the project (he was 4 at the time) and begging me to do it with him. All you need is a muffin tin (I used a mini one for this), tempera paint, and a small piece of cardboard.

- Dip cardboard in green paint and stamp pine needles throughout paper. Let Dry.

- Paint the bottom of the muffin tin in different colors.

- Pick up paper with pine needle prints and lay ontop of muffin tin. Gently pat all over.

- Remove paper and reveal colored ornaments printed ontop! Add gold square to the top of the ornament and draw a line to a branch and wa-la! Ornaments hanging from pine tree branches!


