Alright y'all. Even though I am not in the art room right now, when the clock strikes midnight on the new year, my brain automatically switches into "ART SHOW MODE". I guess that's what happens when you have been putting on a school wide art show for the last 15 years... you dream about art shows even when you are no longer responsible for one 🤪. However, just because I am not putting on a traditional art show this year doesn't mean I don't want to help YOU in any way I can. I could probably write a book about how to put on a school wide art show but for now, I am going to start with what are some of the essential items that will not only save you time but save your sanity at the same time! Are you ready? Let's do it!
10 Must-Have Items Every Art Teacher Needs to Put on an Art Show
1. BINDER CLIPS

Binder clips are your best friend when hanging student art. Check out my blog here to learn about the BEST way to hang student work for an art show. Binder clips allow you to ditch the hooks, dowel rods, paper clips- or any other method you have been trying to figure out when hanging something from the ceiling. Trust me on this- go to my previous blog... and buy boxes of small/ medium binder clips. I like the size 1.25"
2. RAILROAD BOARD / BULLETIN BOARD PAPER


As stated in the previous point, using the method of strips and binder clips (as I'm calling it) was a game changer for me. This was a method of hanging art that has been around my school district since I was a student there in the 90's. I 100% credit "The Art Show Greats" for this one (hi Mrs. Jester, Mrs. Slowik, Mrs. Knapp and more) because this was the way they efficiently hung art for their extravagant and incredible art shows and have to graciously passed down this method to their successors (myself included!) So, you need railroad board (which is basically poster board but a bit sturdier). It may feel expensive to purchase up front but the great thing about railroad board is once you have your strips cut you can re-use them for years if you take care of them and store them properly!


Another popular method for hanging art that I have used over the years is using bulletin board paper to make banners. These are definitely a great way to prep your displays ahead of time and then you can store them... and then bam- just put them all up the day before or of the show! The only downside with banners is finding the best way to adhere the student art to the banners without ruining the art. Many years ago I used to hot glue the corners of the art (the mat of the art actually) to the banners, but sometimes when taking the art off- the mat would rip. Big sad face. You can also try using a double sided tape gun, but I can't speak to how long the tape holds. I would hate for you to spend so much time taping art to banners and then as soon as you hang them, the art falls off. another big sad face. You can ALSO try a long armed stapler- that might be the best bet! Lots to consider here.
3.HELP. Don't be Shy- ask and accept help!


Listen, I know it's tough to ask for help, or even accept help when it's offered but if someone offers to help you- TAKE THEM UP ON THEIR OFFER. I really struggle with asking for help because the people pleaser in me doesn't want to inconvenience anyone. I also struggle with asking for help because I can sometimes be a bit of a *perfectionist* anndddd it's just not easy for me to delegate tasks. However, if you want to put on a nice art show for your school community without losing your ever-loving mind...take people up on their offer to help, and even reach out and ask for help and volunteers.
Once I finally wised up, I started leaving out an "Art Show Volunteers" sign up sheet during open house at the start of the year. That way, once the art show prep and planning got rolling, I have a list of parents who told "Hey! Let me know when you need help, I'm ready to come in!" I also was lucky enough to have some incredible paraprofessionals at my school who started peaking their head in my classroom and asking if they could help with any tasks when their schedule was free. Sometimes students who they shadowed would be absent leaving them with a pocket of free time, or it was a slow day in the office, or whatever! So I decided to start taking people up on their offers, and would have a list of "to-dos" and materials placed near my classroom door so that they could just pop their head in, take the art that needed matted, or the labels that needed cut and head to their own workspace. Another great way to get volunteers is by reaching out to the art teacher at the high school. Often times high school students need a certain number of volunteer hours and if you can snag some art students then even better! Above you will see a high school student from the National Honors Society helping me create a paper mache tree in our library, and my amazing former coworker Danielle helping me make a faux waterfall!
Shower these angels who offer their help to you in gratitude and maybe some coffee or donuts as a thank you, because they are special human beings!


(how stinking cute are my parents helping me out btw?! So lucky to have their support!)
4. CEILING HOOKS & HEAVY DUTY FISHING LINE

Even though binder clips are the #1 way I hang 2-D art, I also have these drop ceiling plastic hooks in my "Art Show Go Box". They are perfect for hanging anything with a bit more weight- for example, we hung clay sloth planters, and clay wind chimes from the ceiling last year. You also need to make sure you have heavy fishing line or some other really sturdy string to hang your pieces with. Nothing is more devastating then hanging a piece of clay and the string giving way, leaving the work crashing to the floor (take it from my experience 😖)
5. A COLORING PAGE THAT DOUBLE AS AN INVITATION


This GENIUS idea came a coworker of mine (shout out to Andrea!) The week of her art show, every student in her classes receives a coloring page that pertains to the theme of the art show or school that also has all of the information for the art show on it. The students spend their class period coloring their invite and then take them home to share them with their families. Last year I drew my invite in Procreate but you can easily draw your invitation with Sharpie and then make copies to hand out to students.
6. ADEQUATE TIME DURING WORK HOURS TO PUT UP YOUR SHOW


I know this is one that may be out of your hands, but it never hurts to ask. Many many years ago when I put on my first art show, I was staying after school until 9pm night after night trying to prep and display all of the art for the show by myself. It was impossible and I was feeling BEYOND overwhelmed. The following year I approached my principal about the possibility of taking 1-2 "Professional Days" to get the art show up. I believe she granted me one day and honestly even that felt like a dream. Over the years some principals have been more accommodating than others- one giving me zero time (and that was the year I just did the best I could during my contracted time but refused to stay late to hang art for someone who didn't value my program 🙃) and others who built in 3 Art Show prep/ break down days, as well as being compensated for some of the time spent after hours (A LITERAL DREAM- SO GRATEFUL TO THIS DISTRICT). Oh and don't forget to consider asking for a day to break down the show. I was granted 3 days, so I usually used 2 days to set up, and saved one day to break down the show.
This is definitely something you won't know the answer to unless you ask. Be brave, bold and daring and ask for the time to create something magical for your school that will not only make your program shine but make your principal look pretty dang good too 😉.
7. CHEAP PLASTIC TABLE CLOTHS


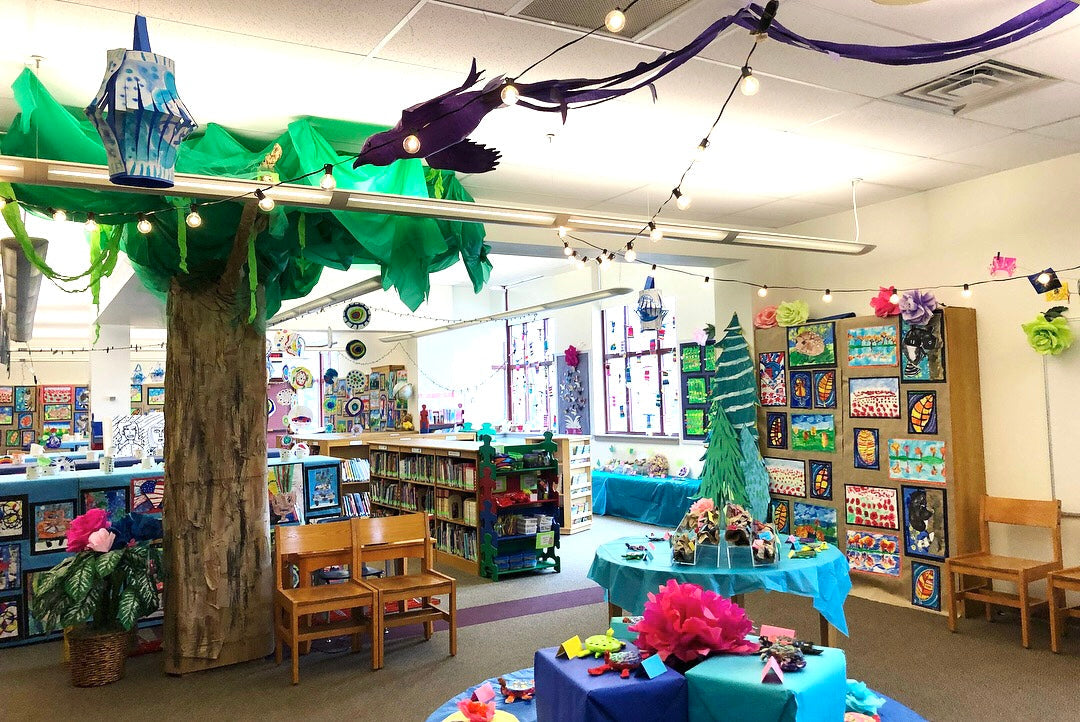
Yall. Trust me on this- run to your local Dollar tree and stock up on cheap plastic table cloths. This is such a great materials to add any *extras * to your art show. Thinking about turning a column into a giant tree? Great- craft paper and green table cloths. Need to cover tables to display clay pieces? Cheap plastic table cloths. Want to make weeping willow branches or vines hanging from the ceiling? Cut those cheap plastic table cloths into strips and cut alternating diagonal lines into each side and hang with paper clips.
8. CARDBOARD


Ok, this one is not essential. but if you're looking to add a little extra *magic* to your art show consider reaching out to a local furniture store near by and ask them for their biggest boxes. This was how I created the trolley, giant stop light and more for my Mister Roger's Art Show. Again- not necessary but fun if you have the time!

9. FUN LIGHTING


One of the elements to my art shows that I find to be a small way to add a bit of magic and wonder is the consideration and adaptation of different types of lighting. For example, a few years ago for my Mister Rogers art show my students each made the most adorable little clay homes for our "School Neighborhood". Of course we could have just displayed these houses on a table with a name tag, but I just wanted it to be *more*. So I invested in buying enough tea lights for the grade level so that we could place a little light inside the house and it would like like the lights were on twinkling away. We dimmed the over head lights in that section of the library so the precious neighborhood could have it's moment. Since then, my 5th grade students have made some type of clay votive where a tea light can be displayed inside. We made clay lanterns and clay tree houses inspired by the movie Encanto.

You can also invest in black lights to create a Black Light room where any artwork painted in fluorescent art supplies will glow and give you alllll the "Ooohs and Ahhhs" you could ever imagine! When I have created a "Black Light Lair" as I called it, I purchased 3 of these Black Light Flood lights to hang from the ceiling in the room that I planned to house the art. Also, there is always something so magical about cafe lights, I don't care what your theme or plans are. Of course, please run all of these plans by your administration to make sure that you are not breaking any kind of fire safety codes!! (This is my "I'm not responsible" disclaimer) .
. 

10. AN "ART SHOW GO-BIN"
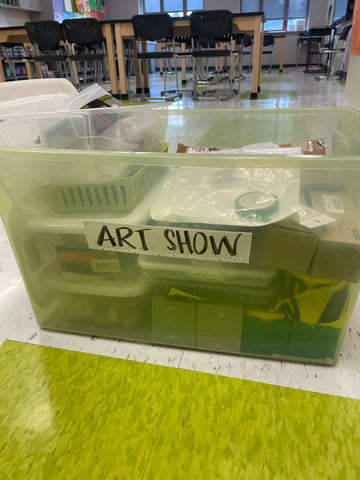
This is basically a large bin/ box/ whatever you want to use where you can keep all of these supplies that you know you will use every year. Once you build up your art show display supplies you can keep them organized safe and sound in this bin that you just need to pull out for next year! A few other essentials that I keep in this art show bin are : gym floor tape (I was never allowed to use any kind of tape on the walls of my school but this gym floor tape was approved for anything that needed anchored to the floor), Loctite fun-tak (THE ONLY BRAND THAT WORKS IMO), wire, wire cutters, zip ties, pre-cut labels for student art, paper clips, crepe paper streamers, cellophane wrap, of course all the binger clips, scissors, variety of tape and more.


*** BONUS TIPS ***
Ok just a few more tips just because I literally can't help myself:
- Utilize CARTS when setting up for your art show. My teammate Katy was the queen of cart utilization and kept us so organized when setting up art in so many areas of the school.

- When picking the date for your art show, consider having it the day before an inservice day so that you can just roll into work the next day and take down the things you need to take down at your own pace.
- Get CREATIVE with how you display student work. Try to force yourself to think beyond 2D art on walls and clay on tables. Consider interesting spaces in your school and how it could incorporate student art.

- Utilize bulletin boards and showcases. I emailed my entire staff last year asked them if I could use the bulletin boards outside of their classrooms and every single one of them said YES. This was a huge time savor for making banners and strips. I also LOVE thinking of creative ways to transform showcases so that it can better compliment the project being displayed in it. For example, my first graders made clay fish for our Mister Rogers theme, so I planned on transforming a showcase into a fish tank for the fish to be displayed. It was so much fun!


- Write out every single thing you need to do on a large white board or large paper so that you can see every task at all times! This was not only super helpful in keeping my brain organized, but it was great for helpers and delegating. 10/10 highly recommend.
- Create an Art Show Scavenger Hunt. Don't take down your art show right away (not all of your hard work- noooooo!) Use art class time to take each class through the art show one more time. Some students may have missed the show and haven't seen it in all of it's glory! To keep your students on track, create an "Art Show Scavenger Hunt" for them to fill out while they enjoy the space. This not only give them accountability and something to stay focused on (eh-hem which helps keep behaviors in check) but also allows for lots of reflection and time to enjoy other students' work, not just their own. There are so many opportunities for amazing conversations, reflection and appreciation for others' hard work.

- Last but not least, HAVE FUN and enjoy your hard work and soak in any gratitude! You're amazing!!!

I certainly could not have put on our jungle themed art show without my incredible teammate, Katy!
Ok I think that's it for now! Do you have any questions regarding the items in this list? I gotchu! Feel free to leave your questions or comments on the blog or reach out to my via Instagram. I'm rooting for you and here to help!!!
Happy Making!
xx- Kaitlyn


2 comments
Thank you for sharing this information! I motivating and very helpful! :)
I am doing an art show for the first time and also for the first time in the school since 3 years.
My biggest question is how to hang the banner on the ceiling with binder clips?