5 Creative Ways to Make Fireworks Art
Note: Some of the links on this blog are affiliate links. This means that if you click on the link and purchase the item, I may receive an affiliate commission at no extra cost to you. I only recommend products or services that I believe will add value to my readers. Thank you for your support!
It's officially July friends, so let's make some fireworks artwork as we gear up for the 4th! Fireworks are a brilliant source of inspiration for art projects, offering vibrant colors, dynamic shapes, and an element of excitement that can be captured in various mediums. Here are five creative methods to bring fireworks to life in your classroom or at home. Each technique has its own unique flair, allowing students to explore different art styles and materials.
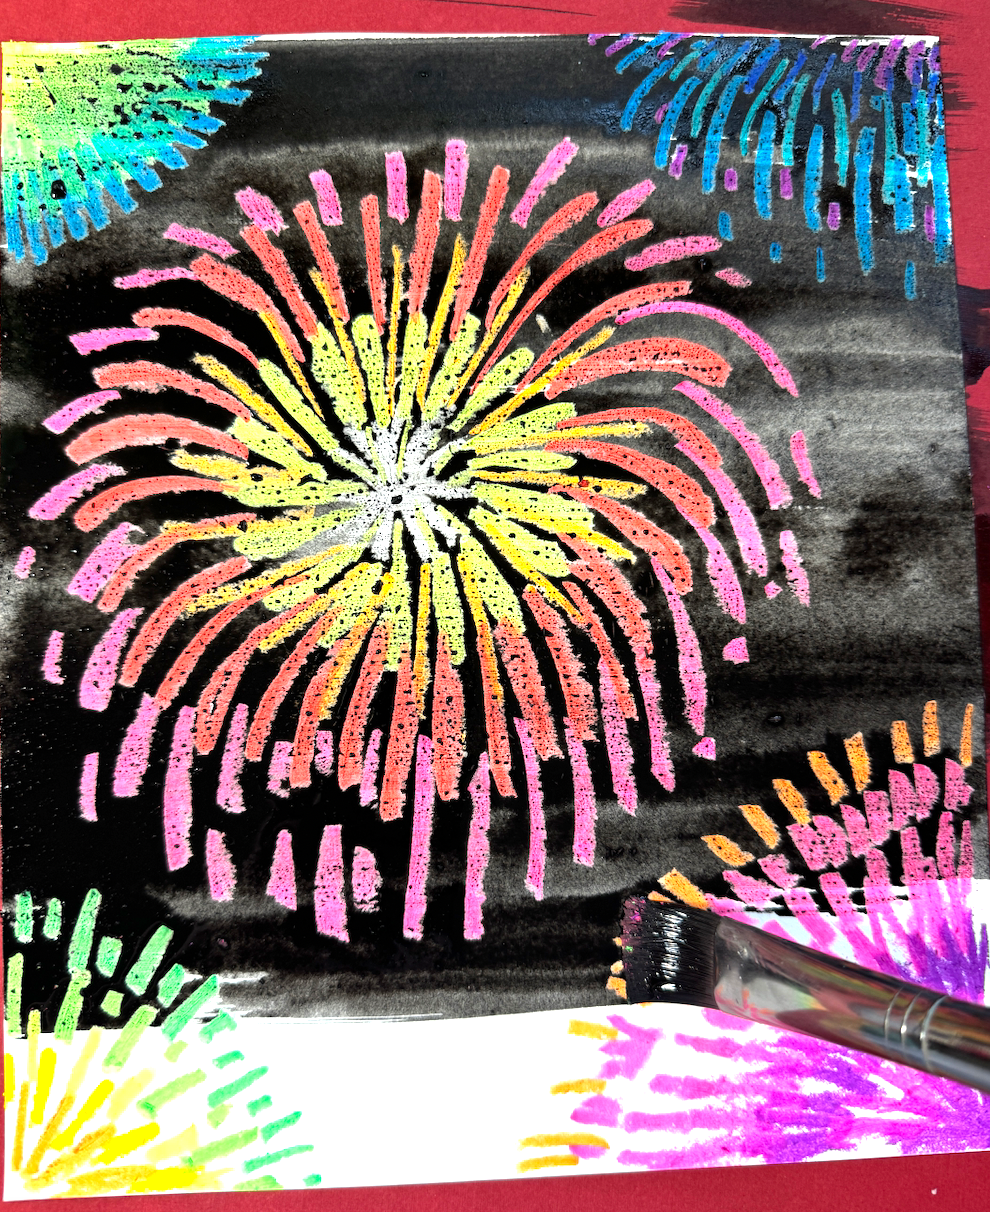
1. Wax Resist Fireworks

Materials Needed:
- White or light-colored paper (watercolor paper works well)
- Neon oil pastels (My favorite are linked here)
- Watercolor paint, or black liquid watercolor
- Paintbrush (flat works best)
- Water
Instructions:
- Draw Fireworks: Using a your neon pastels, draw fireworks on the paper. Encourage your kids to make lines, dots, and bursts that resemble real fireworks.
- Apply Watercolor: Paint over the entire paper with black watercolor paint. The wax will resist the paint, revealing the fireworks design. Experiment with different colors to create a vibrant night sky.
2. DIY Scratchboard Fireworks
Materials Needed:
- Heavyweight paper or cardstock
- Oil pastels or crayons
- Black acrylic or tempera paint
- Dish soap
- Paintbrushes
- Wooden stylus or toothpick
Instructions:

- Color the Base: Cover the entire paper with oil pastels or crayons, using bright and varied colors. I like to color these in a radial design so that the colors match real fireworks better. Make sure the colors are thick and vibrant
- Mix Paint: Mix black tempera or acrylic paint with a few drops of dish soap. This helps the paint adhere better to the waxy surface.

- Paint or Color Over: Apply a thick layer of the black paint mixture over the colored surface and let it dry completely. You can also use a black oil pastel or black crayon to color over.
-
Scratch Fireworks: Use a wooden stylus or toothpick to scratch off the black paint, revealing the colorful fireworks underneath. Students can create intricate designs and patterns.

3. Fluorescent Paint on Black Paper

Materials Needed:
- Black paper
- Fluorescent paints
- Paintbrushes
- Toothbrush (optional)
Instructions:
- Draw Fireworks: Make a dot with your pencil to indicate the center of the firework, then draw or paint lines that radiate outward from that center point in a circle. Paint fireworks designs directly onto the black paper using fluorescent or neon paints (add white to your paint to make sure they pop!) The dark background will make the bright colors really stand out.
- Add Splatter: For extra effect, use a toothbrush to flick small dots of paint onto the paper, mimicking the sparkle of fireworks.
- Highlight: Use a fine brush to add highlights and details to the fireworks, enhancing the glowing effect.
4. Fireworks Straw Printing

Materials Needed:
- Black paper
- straws or cardboard tubes
- bright tempera paint (and white)
Instructions:
- Cut the Straws: with a small pair of scissors cut one or both sides of the straw into small frayed edges.
- Open the Straw: gently fold back the frayed side of the straw to open it up into a flower shape.
- Dip into Paint: Dip the open straw into tempera paint thats been mixed with white (this makes it more opaque against the black paper) and then stamp it a few times on the palette or plate to get off excess paint
- Stamp on Black Paper: Stamp your straw onto your black paper to reveal a firework shaped painting.
- Change Colors: Feel free to change colors and stamp other colors inside of each other. You can also use varying straw sizes so that you can larger and smaller fireworks
5. Raised Salt Fireworks Painting
(you can find a full blog post about this project here!)

Materials Needed:
- Heavyweight paper (watercolor paper works best)
- Pencils
- Liquid glue (white school glue)
- Salt (table salt or kosher salt)
- Watercolor paint or neon tempera cakes
- Paintbrushes
- Water
Instructions:
- Draw Fireworks: Lightly sketch fireworks on the paper with a pencil.
- Apply Glue: Trace over the pencil lines with liquid glue.
- Sprinkle Salt: Generously sprinkle salt over the glue and let it dry completely.
- Add Watercolor: Once dry, use watercolor paints to gently touch the salted areas. The paint will spread and create a beautiful, textured effect.
- Dry and Display: Let the painting dry completely before handling or displaying.
These five different fireworks art projects offer a range of materials for students of all ages and levels! experiences, from the resist technique of wax and watercolor to the tactile process of raised salt painting. Each project allows students to experiment with different materials and techniques, fostering creativity, artistic expression and curiosity. Definitely be sure try out these projects in your classroom or at home and watch the fireworks art come to life!
Happy creating!


